EMM – Introduction
The CaseView core system provides generic support for devices which present an SNMP interface. However, in order to extend the support for network devices, CaseView provides additional Entity Manager Modules (EMMs) which are specific to particular devices and which extend the monitoring and management control of the devices.
This page describes the Case Communications SNMP Enhanced MIB for the XLR 500 Series EMM (Enhanced Management Module). It should be read in conjunction with the XLR 500 Series documentation.
Launching the EMM
Launching the EMM is extremely straightforward.
All you have to do is double click on the icon on the map which represents the XLR you wish to manage.
EMM Appearance
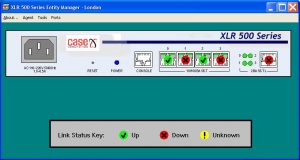
The EMM presents a window which shows a representation of the device. It also draws onto these views the current state of the SNMP-monitorable interfaces (e.g. links, protocols) that the XLR presents to the rest of the network.
This information is continually refreshed at a constant interval – typically every ten seconds.
The screenshot below shows the appearance of the XLR 500 Series EMM screen. In this screenshot it can be seen that two of the LAN links are up.
EMM Menus
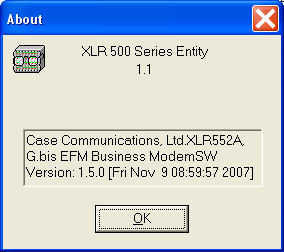
About Menu
The About menu provides information about the EMM version in use and about the information reported by the particular XLR in question.
Agent Menu
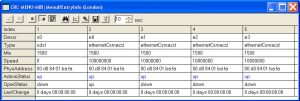
The Agent menu allows you to inspect, chart and graph the MIB-II SNMP variables that the switch supports (an introduction to MIB-II is provided elsewhere in the documentation pack). The switch provides access to the following tables (the numbers in brackets are the MIB Object IDs of the tables):
System Table (1.3.6.1.2.1.1).
Internet Protocol Address Table (1.3.6.1.2.1.4.20).
Internet Protocol Routing Table (1.3.6.1.2.1.4.21).
Internet Protocol ARP Table (1.3.6.1.2.1.4.22).
ICMP Table (1.3.6.1.2.1.5).
SNMP Table (1.3.6.1.2.1.11).
The example below shows the System Table
Note that the Interface Table (1.3.6.1.2.1.2) is not available on this menu but it is available in great detail from the Ports and Port menus.
Tools Menu
The Tools menu allows you to perform miscellaneous operations on the device:*
Make a telnet connection to the XLR manager
Connect to the XLR manager web browser
Show the current settings for many items:
Config0 as a whole
Config1 as a whole
Double tag-id
EFMOAM
Filter
Image
Interface
Log
Log dump
PME
Port
QOS
SNMP
Statistics (Port and PME)
System
Trunk
Users
VLAN
VLAN mode
** Clear config0 or config1
** Copy config0 to config1 (or vice cersa)
** Dump configuration data from either config0 or config1 to the CaseView PC.This option requires that the PC is running a TFTP Server.
See the CaseView Introduction document for more information. The configuration will be stored in a file whose name is created as follows:
_config.cfg.
So, for example, the file that will contain config1 from an XLR named London will be London_config1.cfg.
* Load previously dumped configuration data to either config0 or config1 from the CaseView PC. This option requires that the PC is running a TFTP Server. See the CaseView Introduction document for more information. The configuration will be read from a file whose name is created in the same way as described above.
* Write the current configuration into either config0 or config1
* Restart the XLR
* Store and clear (in the local CaseView database) the Logon and Enable passwords for the XLR manager. If you choose to store a password in the database, you will not be prompted for them each time you want to access the XLR manager – the stored password will be used to try the logon. However, if you choose not to store a password in the database, you will be prompted for it each time you want to access the XLR manager.
Note that these operations simply affect the password stored in the database – they do not affect the real password stored in the XLR itself.
These operations make use of native XLR commands and so more detail on them can be found in the XLR 500 Series documentation.
Port Menu
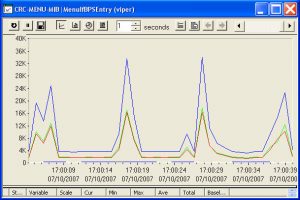
The Port menu allows you to inspect, chart and graph SNMP variables from the Interface Table (1.3.6.1.2.1.2). It displays the interface entry for all the SNMP-monitorable interfaces on the device (as displayed on the graphic device display).
Full View. This displays every variable in the entry.
Info View. This displays a selection of the more important variables.
Usage (BPS) View. This displays the port usage variables.
Utilisation (%) View. This displays the port utilisation variables.
The Port menu is available when a particular port has been selected. You select a port by right or left clicking on its icon on the graphical display. This is the icon that is reporting its current status (Up/Down/Unknown).
It provides access to the same variables as described in the Ports menu, the only difference being that it is the data for the selected port (rather than all ports).
For more information please contact Case Communications